More of my favorites...

Saturday, February 26, 2011

Pumpkin bars with cream cheese frosting

I am feeling a bit uninspired when it comes to blogging lately;  I need to step up my game!  Any great suggestions?!

Last week I was supposed to host a group meeting at my apartment, and then this happened:


Over 16 inches of snow in 24 hours - a total mess.  BUT...classes were cancelled which is completely unheard of at the U!  What a treat!  My roommates and I sat at home all day with a glass of wine watching Sex and the City.  Needless to say my group meeting was postponed, and I was left with a tray of goodies - so dangerous.


The cookies are oatmeal chocolate walnut.  I used the same recipe as my oatmeal chocolate cherry cookies, but rather than adding cherries, I added walnuts.  The chocolate cherry cookies were better, though the walnuts were good too.  I guess it depends on what you like - it's a great recipe!

The pumpkin bars are my Nanny's - my mom's mom - recipe.  They are absolutely fantastic and will melt in your mouth.  I could eat the entire pan myself.

Pumpkin bars with cream cheese frosting

1 C oil
4 eggs
2 C sugar
1 - 15 oz can pumpkin
2 C flour
2 t baking powder
1 t baking soda
1/2 t salt
2 t cinnamon
1/2 t ground ginger
1/2 t ground cloves
1/2 t nutmeg

For the frosting

6 oz cream cheese, at room temperature
6 T butter, softened
1 T milk
1 t vanilla extract
4 C powdered sugar

Preheat your oven to 350.  Spray a 9 x 13 inch cake pan with non-stick cooking spray.

Prepare your batter in a large mixing bowl, beating the first four ingredients until well-combined.  Add your remaining ingredients, and mix well.

Pour your batter in to the prepared cake pan.  Bake for approximately 25 minutes, and check with a toothpick.  Bake further as needed.

Once the pumpkin bars are done baking, allow them to cool completely.

Prepare the frosting by combining all ingredients in a medium mixing bowl and mixing with an electric mixer until smooth and creamy.  Frost the bars once they have cooled.

Proceed with extreme caution - once you start eating them, you may not be able to stop!

Cheers!

K


Saturday, February 19, 2011

A little home decor

I am going to switch gears from the kitchen and talk about another passion - home decor.  I have been in a decorating frenzy all week.

I even sunk as low as to go to my least favorite store in the entire world - Joann Fabrics - three days in a row.  But, it is done and was well worth it; my living room finally looks complete.

So, here are the new additions:


I bought a very substantial mirror at Target to put above the sofa.  On either side of the mirror I framed two pieces of fabric, which makes for very cheap and cute artwork.  I bought two frames at Target and glued the fabric to the mat of each frame.  Unfortunately there is a glare in the photo, so it is a bit hard to see!


I also needed a relatively substantial piece of artwork to fill the wall above our chair, so I did an oil pastel drawing of the back of a nude woman.  This was no easy task.  The drawing itself was not difficult, but the first time I hung it, the frame fell and broke (that frame was from Ikea - go figure).  So I threw the frame in the dumpster and bought a new one at Target.  The mat on my new frame, however, was too small for my drawing, so I thought, Okay; well I will just draw a new one.  Three attempts and every one of them was bad.  I had no other choice than to dumpster dive to find the mat from my broken frame.  Of course someone had to throw their trash out at the exact moment that I was fishing around in the dumpster, so I looked like a crazy person.  Whether or not all of my trouble was worth it, I am really not quite sure, but I am pleased with how the drawing looks in the room.

Last night I had my mom over to show her the new additions to my apartment.  Seeing as I was "entertaining," of course I had to run to my favorite store, the one and only Surdyk's.  I have to say the trip was well-deserved, after having spent so much time at Joann this week. Ugh!

I bought two bottles of wine to share, grapes, Gouda cheese, Greek olives, and my favorite Carr's whole wheat crackers - they taste like cookies!  It was a delightful spread - brainless for entertaining.


I guess that is all I've got!  More baking and entertaining this week - can't wait!

Cheers,

KCK

Friday, February 18, 2011

Chocolate whoopie pies

Hey ya'll!

I have neglected to blog for the past week and a half, so it is good to be back at it!  Although, the past two weeks have been anticlimactic in the kitchen arena.

First of all, to be completely honest, I am bored of my lunch challenge; so I am quitting - a whole three weeks in.  And to think that I was going to do it for a whole year!  If any of you have any strong opinions regarding this decision, feel free to share.

Now, moving on to bigger and sweeter things.  I finally found a recipe for chocolate whoopie pies and have made two batches in the past two weeks.  Classic and delicious.  Also, this month's Taste of Home features four recipes for whoopie pies, so stay tuned.  They sound fantastic.

I made my first batch of chocolate whoopie pies in honor of a woman I work with, Kelsey, who just had a baby boy named Rowan Jack.  What a great name.  The second batch was for one of my classes for Valentine's Day.  Both batches were a hit!

Chocolate Whoopie Pies, modified from King Arthur Flour

1/2 cup butter
1 cup brown sugar, packed
1 teaspoon baking powder
1/2 teaspoon baking soda
3/4 teaspoon salt
1 teaspoon vanilla extract
1 large egg
1/2 cup cocoa
2 1/3 cups all-purpose flour
1 cup milk

For the frosting:

3 C powdered sugar
1/3 C butter, softened
2 T milk
1 t vanilla

Preheat the oven to 350, and prepare a baking sheet by covering it with parchment paper. 

In a large bowl, beat butter, brown sugar, baking powder, baking soda, salt, and vanilla until smooth.  Add your egg, again beating until smooth.


Add the cocoa, mixing until just combined.


Alternate adding the flour and mild to the batter, beating between each addition.


Place spoonfuls of batter on to the parchment paper-lined  baking sheet, 2 inches apart.


Oops!  I guess I didn't line my cookie sheets, but I use cooking spray, which worked great.

Bake for 8-10 minutes, or until pies are just set.


Now make your delicious, creamy filling - the best part.  Beat all frosting ingredients in a bowl until creamy.  Add more milk as needed in order to reach the consistency you want.

When your pies are completely cooled, spread a heap of frosting  on to the "underbelly" of one of your cakes.


Place another cake on top of the frosting to make a sandwich.


Killer.

Cheers!

K


Monday, February 7, 2011

Chicken white bean chilli - Week three of the lunch challenge

Three weeks down and I am moving right along.  Sunday night I decided to forgo any Superbowl parties for a night of solitude.  And I call myself an advertising student.  That is sad.

It was well worth it, though.  I had a lovely evening alone in my apartment, listening to oldies and sipping white wine.  I also made some delicious chicken and white bean chilli - perfect for this time of year.  I had some last night, and the leftovers made for a delicous, filling warm lunch today.

Chicken white bean chilli

2 boneless skinless chicken breast
1 onion, chopped
1 T olive oil
1 t oregano
1/4 t cayenne pepper
2 cans Great Northern or Navy beans, drained and rinsed
14 oz chicken broth
1 1/2 t garlic powder
4 cloves garlic, pressed
2 cans green chillies
1 C nonfat plain Greek yogurt (a great substitute to sour cream!)
Splash of milk

Boil your chicken breast in water until it is cooked all the way through.  Let the chicken cool, then shred.  Heat the olive oil on a skillet, then add the chopped onion and saute.  After a few minutes add your pressed garlic and continue sauteing.  Once tender, remove the skillet from heat.

Place all ingredients EXCEPT your milk and yogurt in to a large saucepan and bring to a boil over medium heat. 


Don't let the bland and boring color deceive you!


Reduce heat to low and let the chilli simmer for 30 minutes.  Mix in the Greek yogurt and add a splash of milk as well.


Top with mozzarella cheese and a dash of cayenne pepper for an extra kick.  I would also recommend making some cornbread to go along with it!

Cheers!

K

Sunday, February 6, 2011

Homemade pizza + PW's mocha brownies = killer combo

Last Thursday night was Lady's (and a gentleman's) Night at my apartment before we headed to Psycho Suzi's in Northeast.  Appetizers and wine of course were exchanged.  My friend Laura so generously brought fenomal almonds coated in a sugar and cayenne mixture.  I single-handedly probably ate half of the bowl.  Part of me is hesitant to even ask for the recipe because I am sure I would eat the whole batch in one sitting if I made them!

I took the opportunity to make homemade pizzas.  I have had the dough recipe for a while now and have been dying to try it.  A woman I work with - Kelsey - recommended it to me and said it was fantastic.  My experience with homemade pizza thus far has been unmemorable - always too doughly - so I was excited to try this recipe for a lighter, crispier crust.

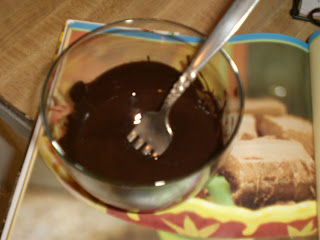
As usual, I baked for the gathering, too - Pioneer Woman's mocha brownies.  One bite of these babies and you will die of delight.

So, let's do dessert first.

Mocha Brownies, from The Pioneer Woman Cooks

2 1-oz squares unsweetened chocolate
1 stick butter
1 C sugar
2 large eggs
1 1/2 t vanilla extract
1/2 C + 2 T all-purpose flour

For the icing:

1 stick butter
2 1/2 C powdered sugar
2 T cocoa powder
1/8 t salt
1 1/2 t vanilla extract
1/4 C strongly brewed coffee, at room temperature

Preheat your oven to 325.  Spray an 8 x 8 in cake pan with non-stick cooking spray. 

Begin by making your brownie batter.  In a microwave safe bowl, melt your chocolate squares slowly - at 70% power, stirring every 30 seconds until chocolate is completely melted.  Set aside. 


Cream the butter and sugar.


Now beat in the eggs.

While mixing on low, pour your melted chocolate in to the bowl.  Mix in the vanilla extract.


Add the flour to your batter and beat until just combined.  Do not overmix.  The batter will be thick - yum!  Pour in to your prepared baking pan and spread evenly.


Bake for about 22 minutes, then check with a toothpick.  Bake longer as needed.  Set aside to cool before icing.

Now for the best part - mocha icing!

Soften the butter a bit, and combine with all ingredients EXCEPT the coffee.  Whip with an electric mixer until smooth.  Then add your coffee and mix.  If the icing is a bit too thick, feel free to add more coffee, a little at a time, until you reach your desired consistency.

Spread the frosting over the cooled brownies, and dig in!  You won't be able to stop.  It took all of the self-control I had to just have two.


And now for a savory treat.

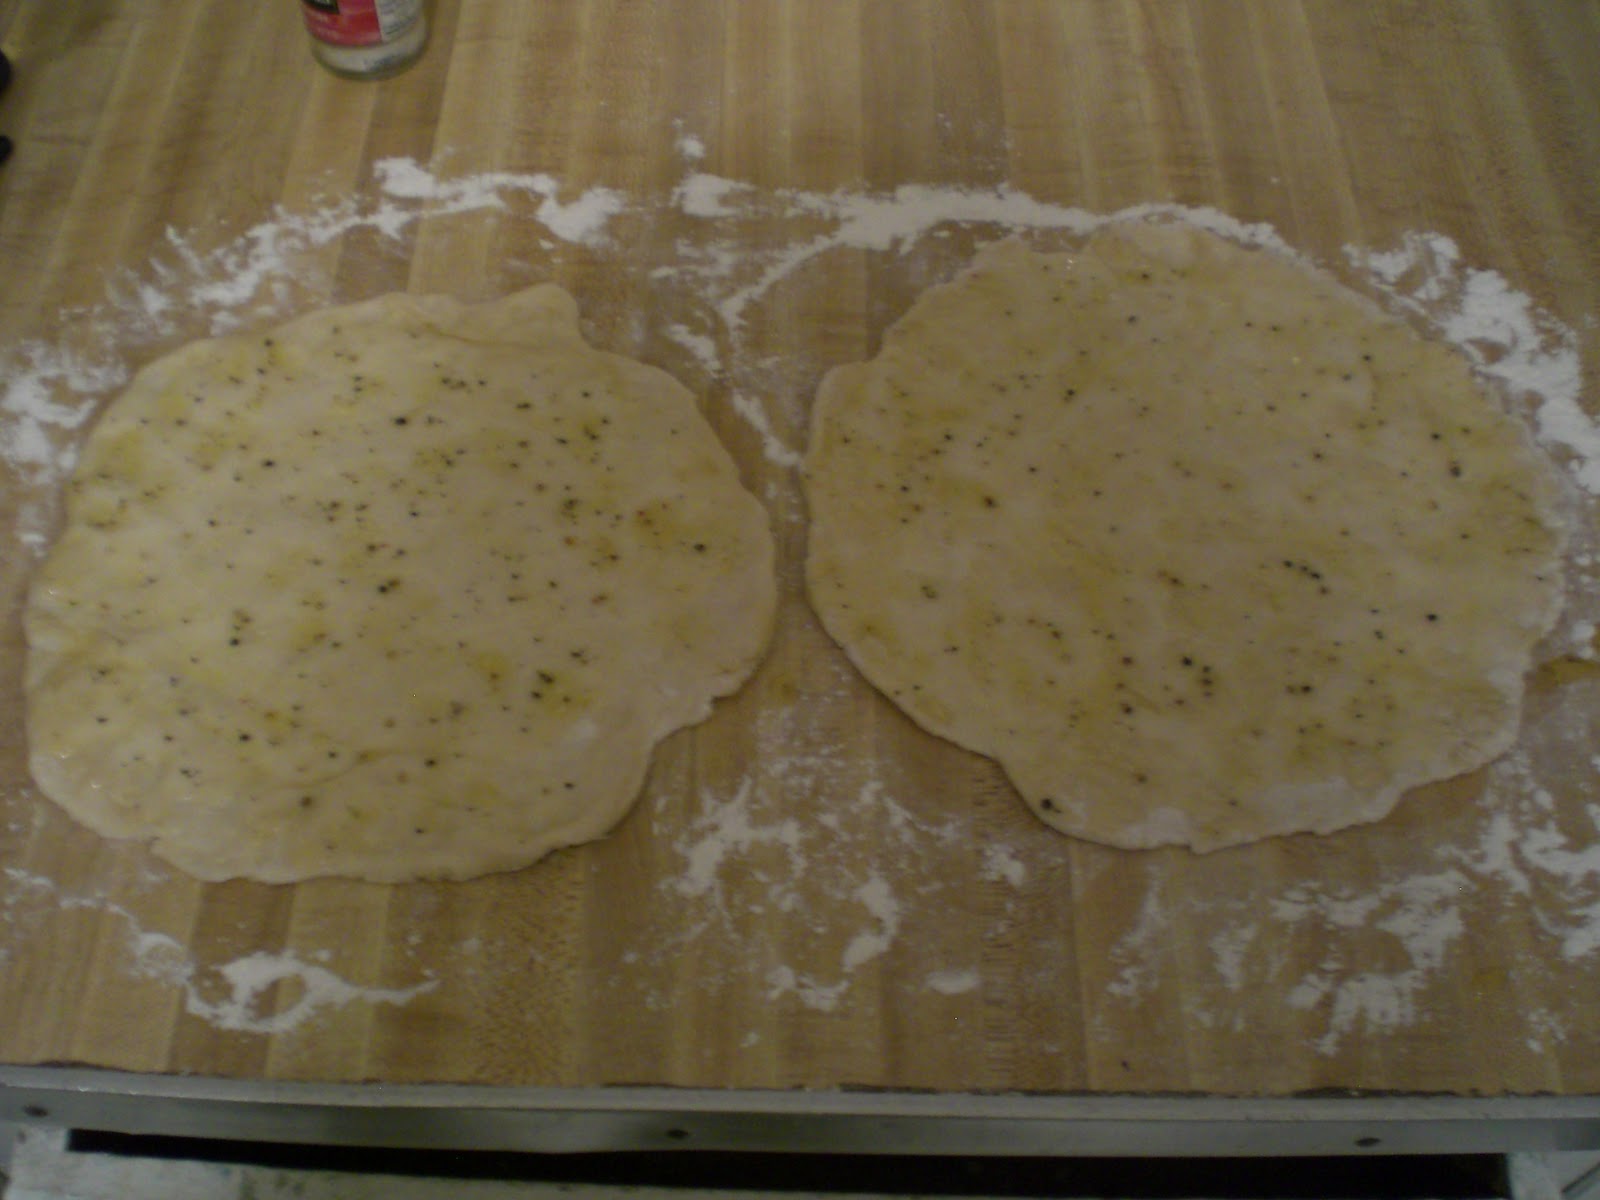
This was my first attempt at homemade crust, and I am pleased to say that it was a success.  The recipe is modified from 101 Cookbooks.

Here is what you will need:

Note:  I made half of this batch, which made two thin, 8-10 inch pizzas.

4 1/2 C all-purpose flour chilled
1 3/4 t salt
1 t instant yeast
1 3/4 C ice cold water

Stir the flour, salt, and yeast in a large bowl.  Use a large metal spoon to mix in the cold water until all is absorbed.  At this point, I got my hands dirty.  Dip your hand in to flour to prevent the dough from sticking to your hand.  Knead the dough with your hand for five to seven minutes, spinning the bowl with your other hand in one direction, then the other, while you knead.  The dough should be springy and elastic.

Take half of the dough, roll it in to a ball with your hands, and spread a bit of olive oil over the ball.  Place in a ziploc bag and refrigerate over night.  Do the same with the other half of the dough.  You can keep the dough in your fridge for up to three days.

On the day you would like to make the pizza, preheat your oven to 550.  For best results bake on a pizza stone, but you can also use a baking sheet.  Place the pizza stone in the oven to heat before baking the pizza. 

Spread flour over a sanitary work surface.  I used my counter.  Place a dough ball on to the surface.  With floured hands, spread the dough until it is about 8-10 inches in diameter.


You may put whatever you'd like on your pizzas.  I made spinach tomato feta pizzas.  Here is what I did:

In a small bowl, combine olive oil, sea salt, fresh cracked rainbow peppercorns, and two cloves garlic, pressed.


Pour a bit over each crust and spread with your fingers.


Then I covered each crust with spinach, sliced roma tomatoes, and feta.


To make your life easier, transfer one of the pizzas on to a well-floured baking sheet, then to the hot pizza stone.  Bake for about 12 minutes or until the crust in golden brown on the edges and crispy in the middle.

I forgot to get a picture of the end result.  Darn!  Sorry guys.

It was a successful menu for the night.

And these are my beautiful friends.


Cheers!

K


Wednesday, February 2, 2011

What's in my lunch box? Week two.

I have not forgotten about the challenge that I made for myself, but I have to admit, my lunches have been more boring this week.  However, none of them have consisted of turkey sandwiches.  Always a good thing.

This week I needed to be a bit resourceful.  I always buy vegetables and end up throwing half of them away because they go bad before I eat them.  This week, however, I am happy to report that I have not had to throw one vegetable away.  It also helps that I am trying to get more vegetables in to my diet.

Anyway,  Sunday night around 10 I realized I had to make something, anything, for lunch to avoid packing a sandwich.  God forbid, right? ;)  I sauteed the remainder of the mushrooms and broccoli I had in the fridge in olive oil.

At this point I would add my pictures.  Sadly, my highly un-tech-savvy self cannot figure out how to get them from my iPhone to my blog.  Seems like it would be easy enough, but for some reason I can't figure out how to save them to my computer from my email.  Nor do I really have the patience right now.

I tossed my sauteed veggies with penne, more olive oil, sea salt, fresh cracked rainbow peppercorns, and one clove of minced garlic; however, next time I would add another clove of garlic for more taste.  I topped the pasta with shredded parmesan and heated it the next day for lunch.

The results?  I really liked it.  It was a bit bland - next time I would use more salt, pepper, and garlic - but I will say that despite a small lack of flavor, the pasta was highly satisfying.  Great way to use up extra veggies before they go to waste, too.

Right now I am sipping my favorite red wine, in my adorable new apron, listening to Nat King Cole on Pandora radio.  What a relaxing night!  I am not wearing my new apron solely for kicks, though.  I baked PW's mocha brownies - yum - and am now about to move on to my first attempt at pizza dough from scratch.  Wish me luck, and stay tuned for a great post this weekend!

Enjoy the rest of your week.

Cheers,

KCK